
Understanding your home
Advice
⚡ Electrics

Earthing explained simply
“Everything works at home, so everything's fine!” That's what this customer thought, until we measured it.
Think of electricity as water in the pipes of the house. When an appliance leaks, the current needs to escape through a big pipe running into the ground: that's the earth connection. If that pipe is half blocked, the leak drains away badly and can go through the person touching the appliance.
At this customer's home, the tester read 302 ohms. A house needs less than 100 ohms: three times too high. A poor earth is invisible in everyday life, which is why it's worth having it checked.
Have my earthing checked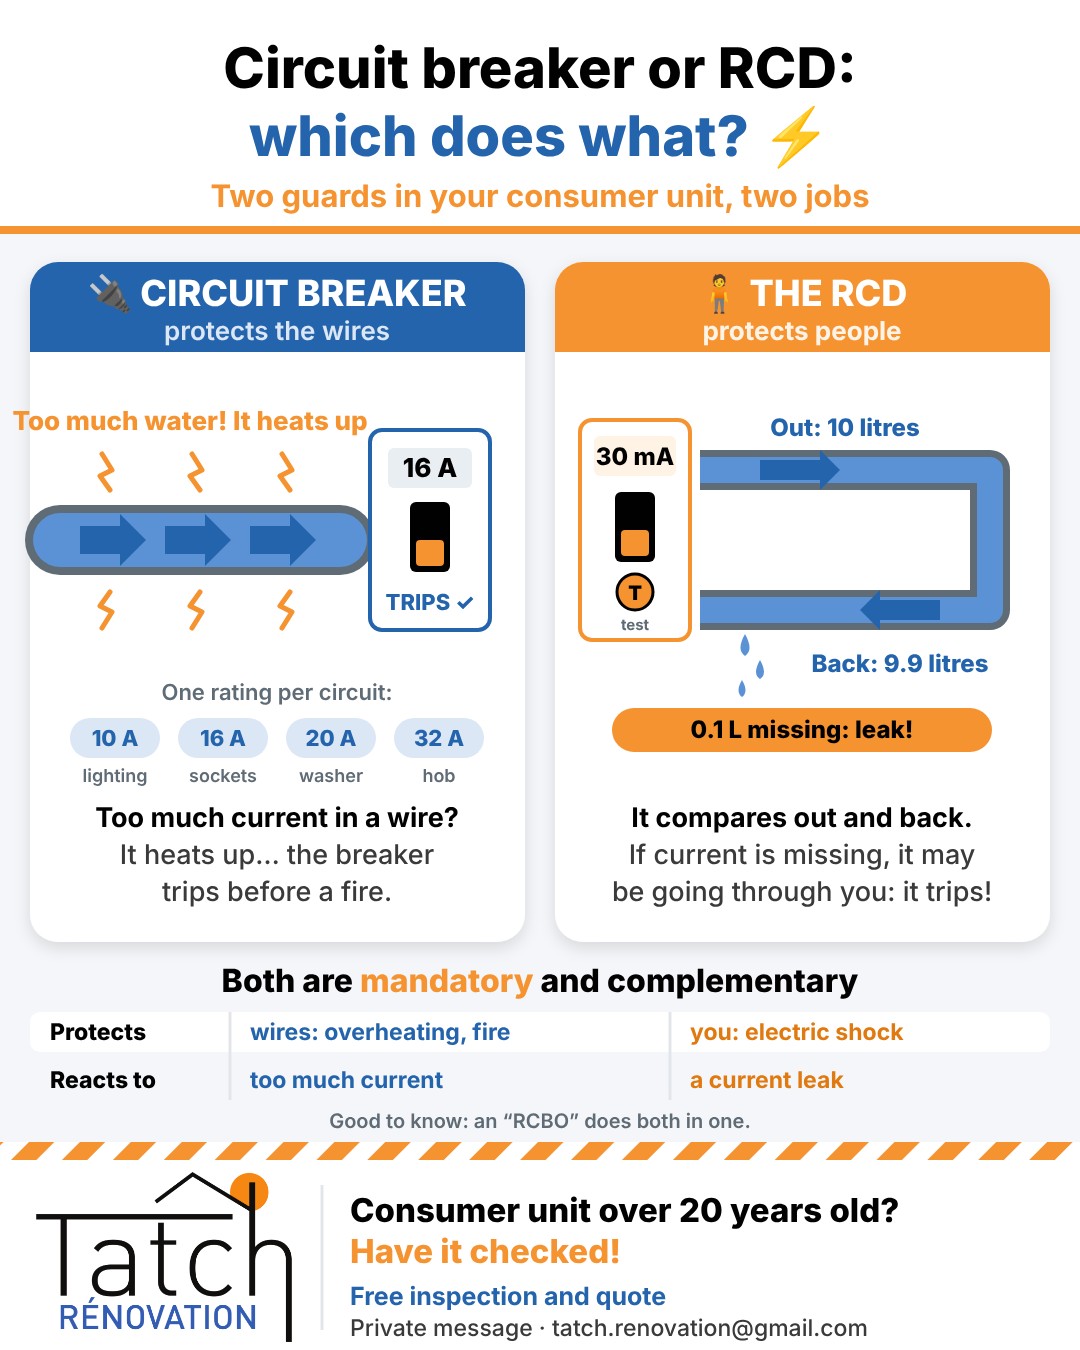
Circuit breaker or RCD: which does what?
In your consumer unit, they are often confused. Yet these two devices each have their own job, and one doesn't replace the other.
The circuit breaker protects the wires. Picture a pipe with too much water forced through it: it swells and eventually bursts. An electrical wire is the same: too much current and it heats up. The breaker cuts off before it becomes dangerous. Each circuit has its own, sized correctly: 10 A for lighting, 16 A for sockets, 32 A for the hob…
The RCD (residual current device) protects people. It counts the water going out and the water coming back. If even a tiny amount is missing, there's a leak, perhaps through someone touching a damaged appliance. From a leak of 30 mA, it cuts off the whole group of circuits in a fraction of a second. Remember to press its “T” button once a month to check it works.
Both are mandatory in an installation that meets current standards. And the “RCBO”? It's simply both in one.
Have my consumer unit checked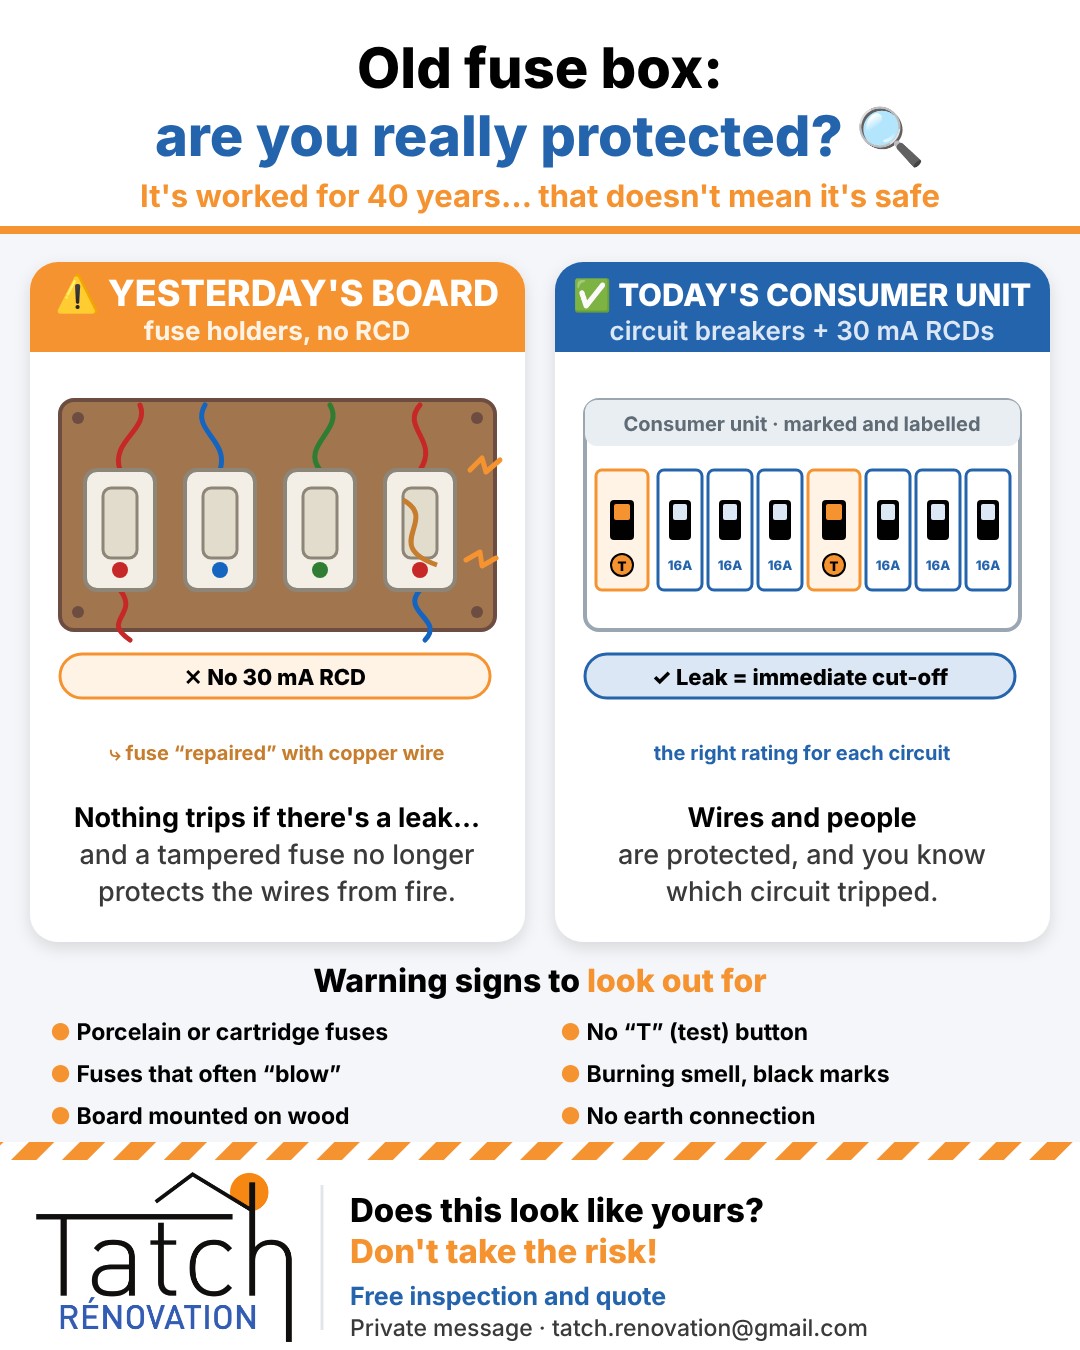
Old fuse box: are you really protected?
“It's worked for 40 years, why change it?” True, the lights come on. But an old fuse box, often mounted on a wooden board, usually has no RCD at all.
As a result, if an appliance or a damaged wire leaks current, nothing cuts off. The current can go through the person touching it, especially in a bathroom or a kitchen. That's exactly what a 30 mA RCD prevents.
Another common trap: the fuse that “blows” too often and gets “fixed” with a piece of copper wire. The circuit no longer cuts off at all: the wire can overheat until it catches fire without anything reacting.
Warning signs: porcelain or cartridge fuses, no “T” test button, fuses blowing often, a burning smell or black marks, no earth connection. If this sounds familiar, have your installation checked: a modern consumer unit with circuit breakers and 30 mA RCDs protects both the wires and the people.
Have my fuse box inspected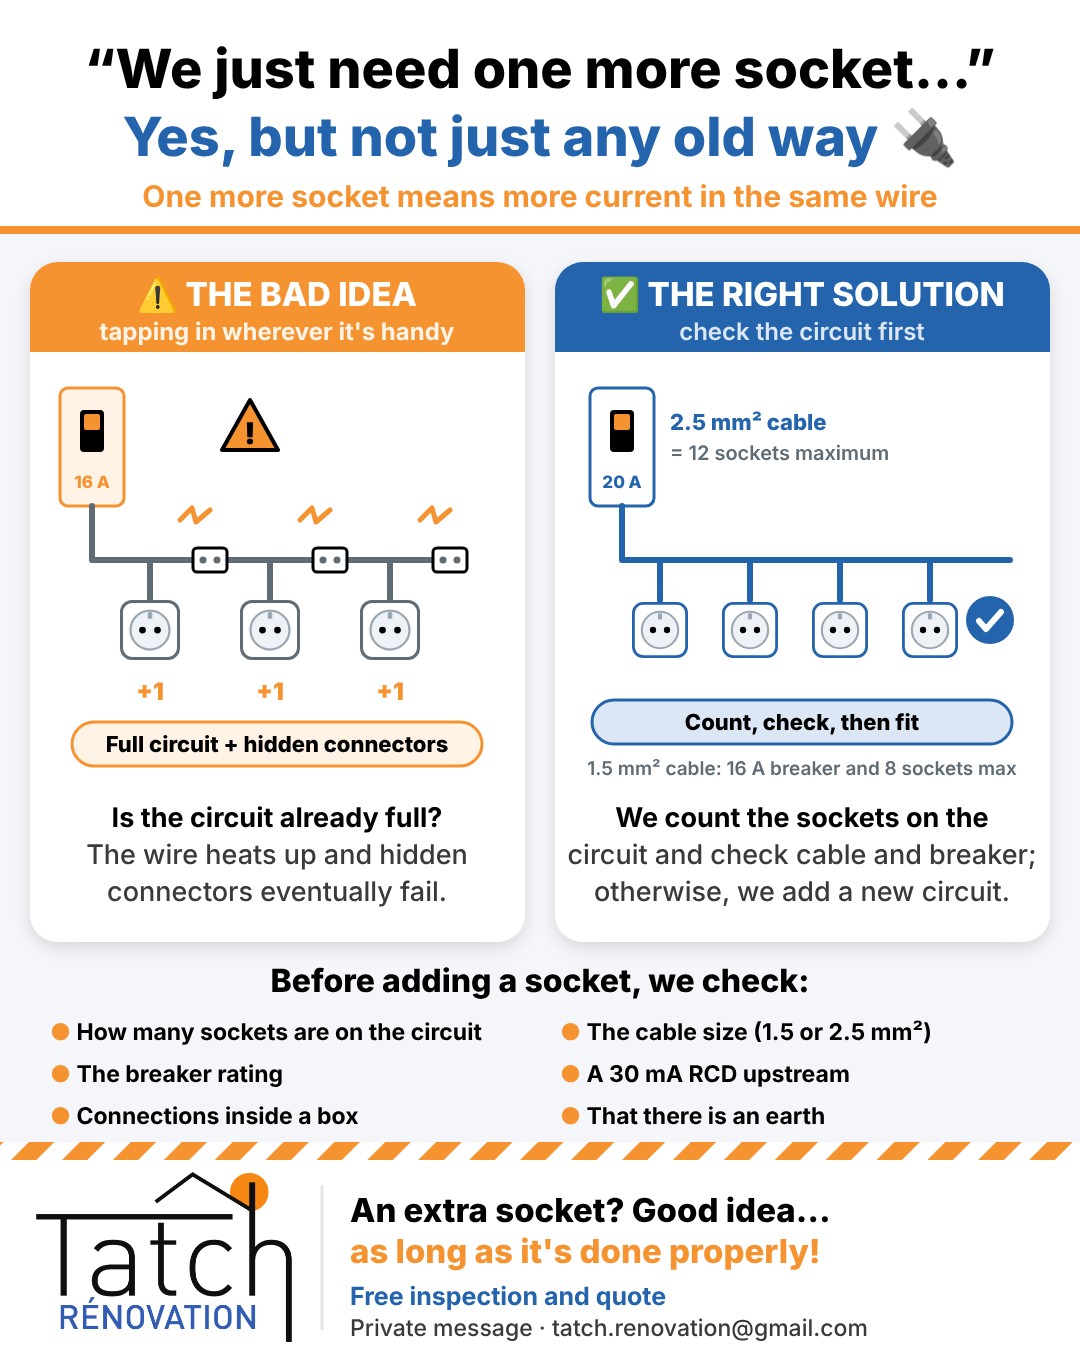
“We just need one more socket…”
It's probably the request I hear most often. And yes, it's often possible! But one more socket also means more current running through the same wire.
Every socket circuit has a limit: 8 sockets maximum on 1.5 mm² cable protected at 16 A, 12 sockets maximum on 2.5 mm² cable protected at 20 A. Beyond that, the wire can overheat without anyone noticing.
The other trap is the “little extensions” made with connector blocks hidden inside a wall or behind furniture. Over time these connections work loose, heat up and can start a fire.
So before fitting a socket, I check how many sockets are already on the circuit, the cable size, the breaker rating and that there's a 30 mA RCD. If the circuit is full, the right solution is to add a new one.
Add a socket safely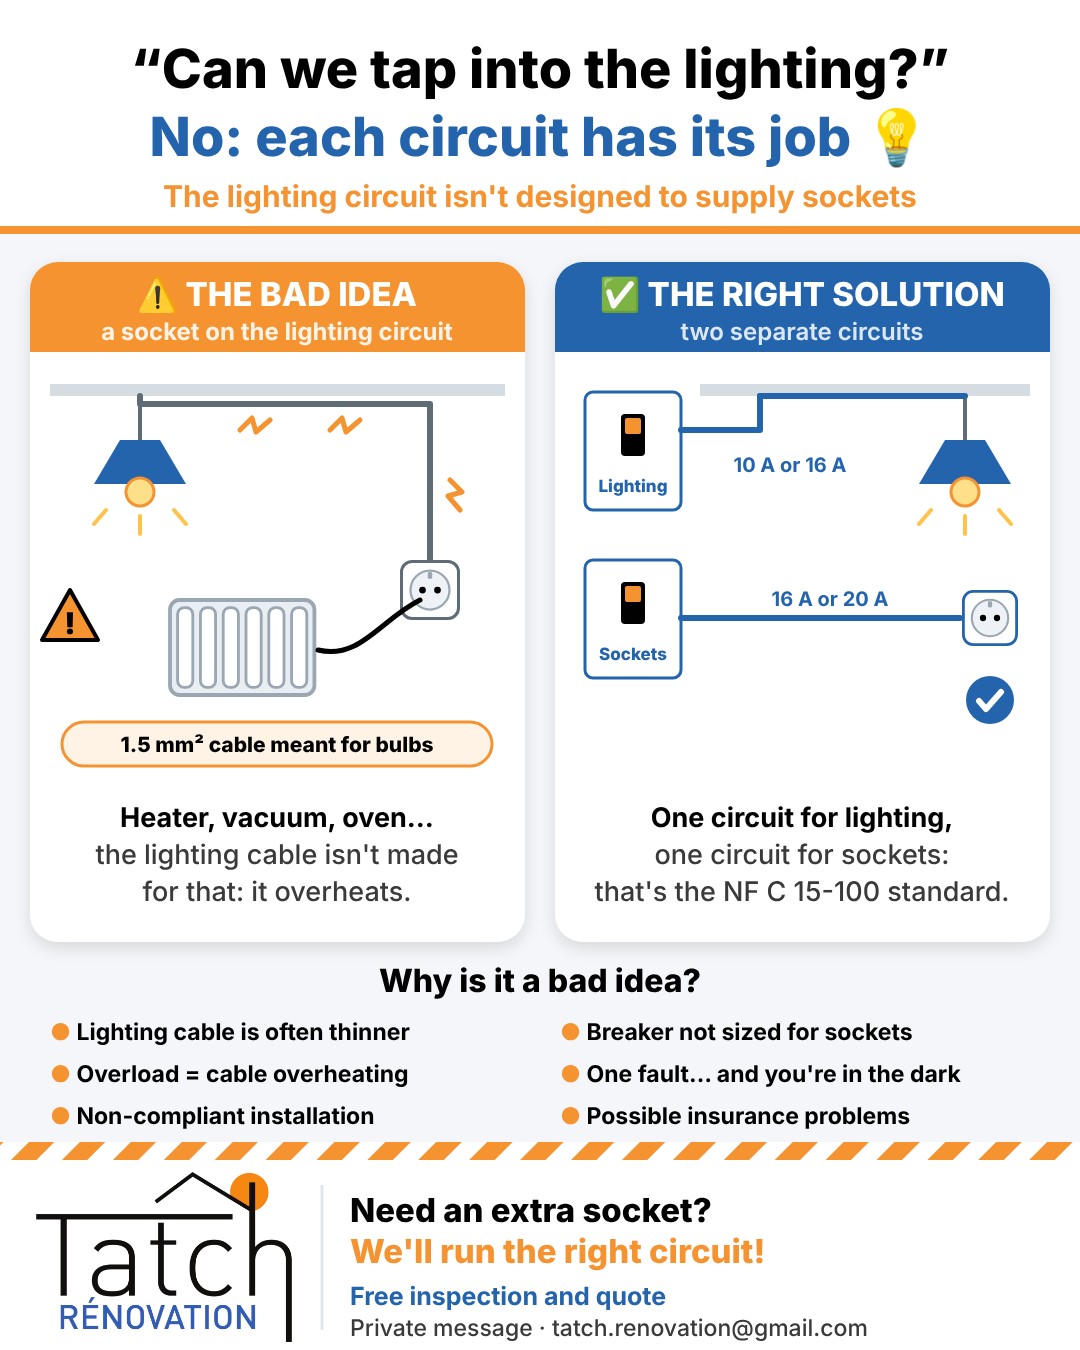
“Can we just tap into the lighting circuit?”
The ceiling light cable is right there, it's tempting! But the lighting circuit isn't designed to supply sockets.
It's made for light bulbs, which use very little power. The cable is often thinner and the breaker isn't sized for a heater, a vacuum cleaner or an oven. The result: the cable heats up, the breaker trips… and when there's a fault, you're left in the dark.
The French wiring standard NF C 15-100 is clear: one circuit for lighting, one circuit for sockets. Mixing the two makes the installation non-compliant, which can be a problem when you sell or make an insurance claim.
Need a socket in a specific place? We connect it to an existing socket circuit if it allows, or we run a new circuit.
Ask for a new socket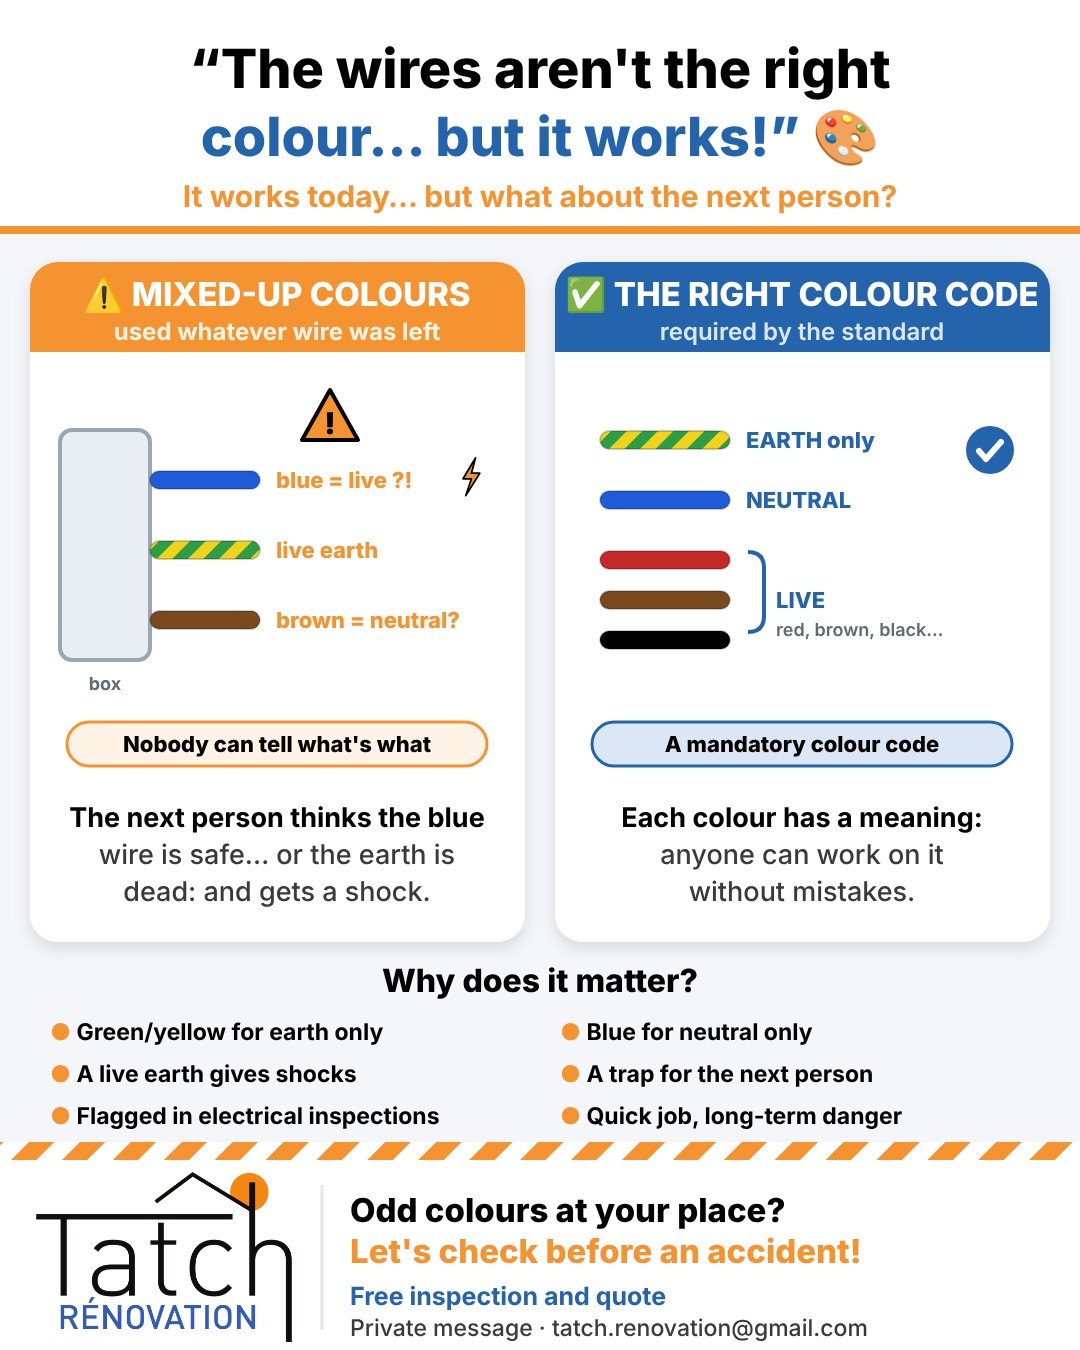
“The wires aren't the right colour… but it works!”
Yes, electricity doesn't see colours: the light still comes on. But the colours aren't there for decoration, they're there to protect whoever works on it next.
The code is mandatory: green/yellow for earth only, blue for neutral, and the other colours (red, brown, black…) for live.
If a blue wire is used as a live, the next person to open the box, you, a relative or an electrician, will think it's safe. Worse still: a green/yellow wire used for anything other than earth can make the metal casing of an appliance live.
These mistakes are flagged during an electrical inspection. They're easy to fix, so better to do it before an accident.
Have my wiring checked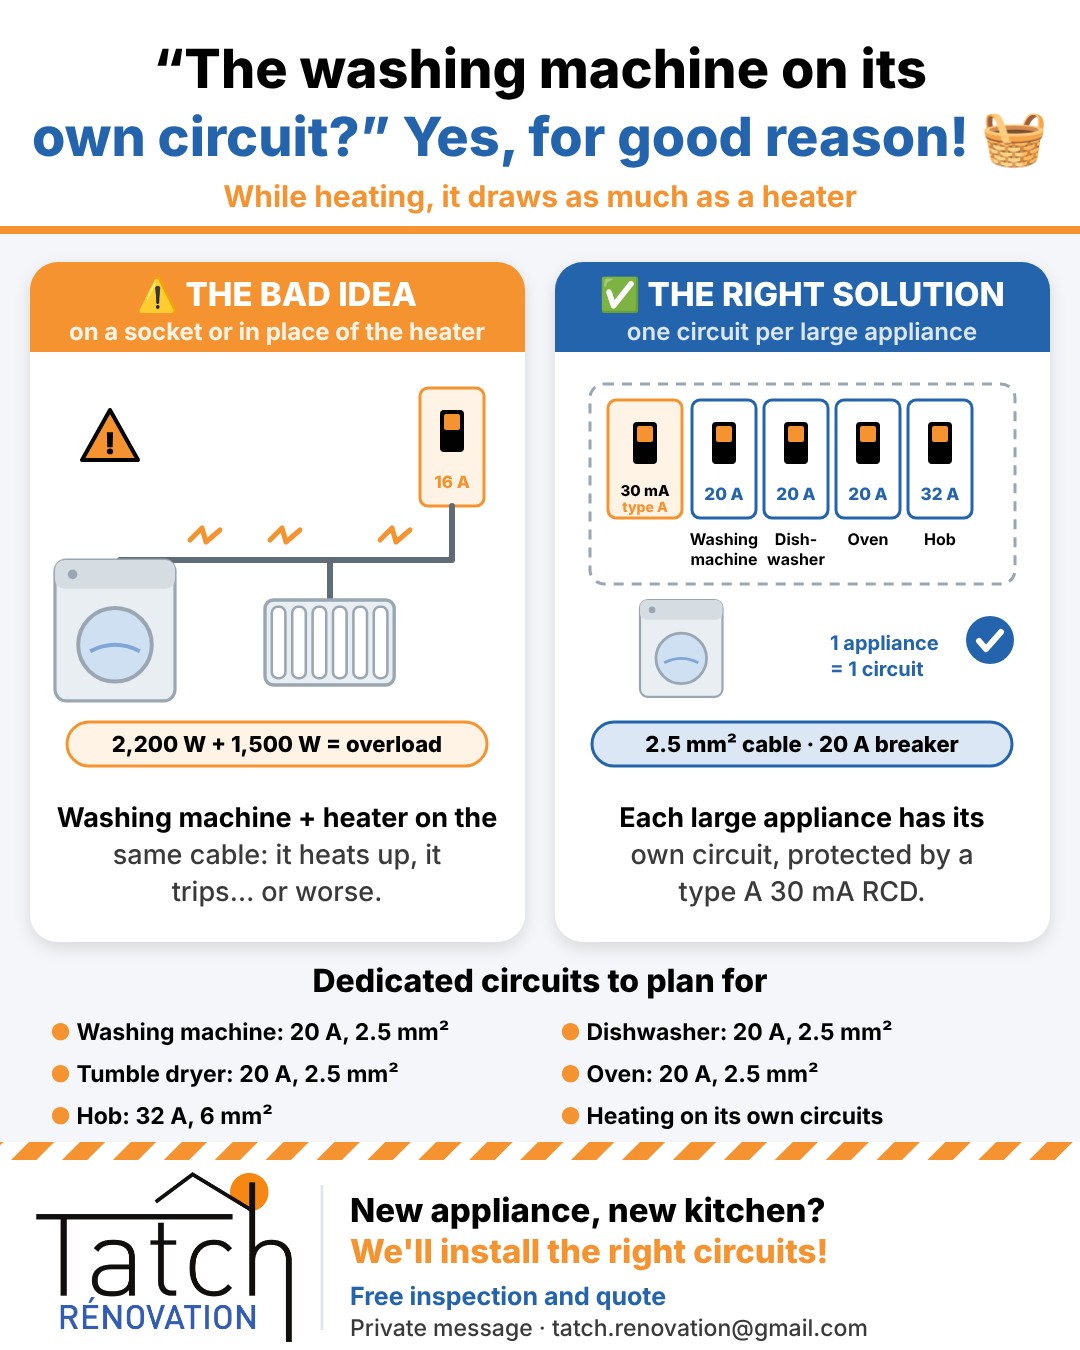
“The washing machine needs its own circuit?”
Yes, and it's not an electrician's whim! While heating water, a washing machine draws about 2,000 to 2,500 W, as much as a heater.
Plugging it into a socket already in use, or “in place of the heater”, means running two large appliances through a cable meant for one. The circuit is overloaded: the cable heats up, the breaker trips, or worse.
The standard requires a dedicated circuit for each large appliance: washing machine, dishwasher, tumble dryer and oven at 20 A on 2.5 mm² cable, hob at 32 A on 6 mm² cable. The washing machine and the hob must be protected by a type A 30 mA RCD.
Heating keeps its own circuits. New kitchen, new appliance or utility room? We plan the right circuits from the start.
Add a dedicated circuit🏠 Interior design
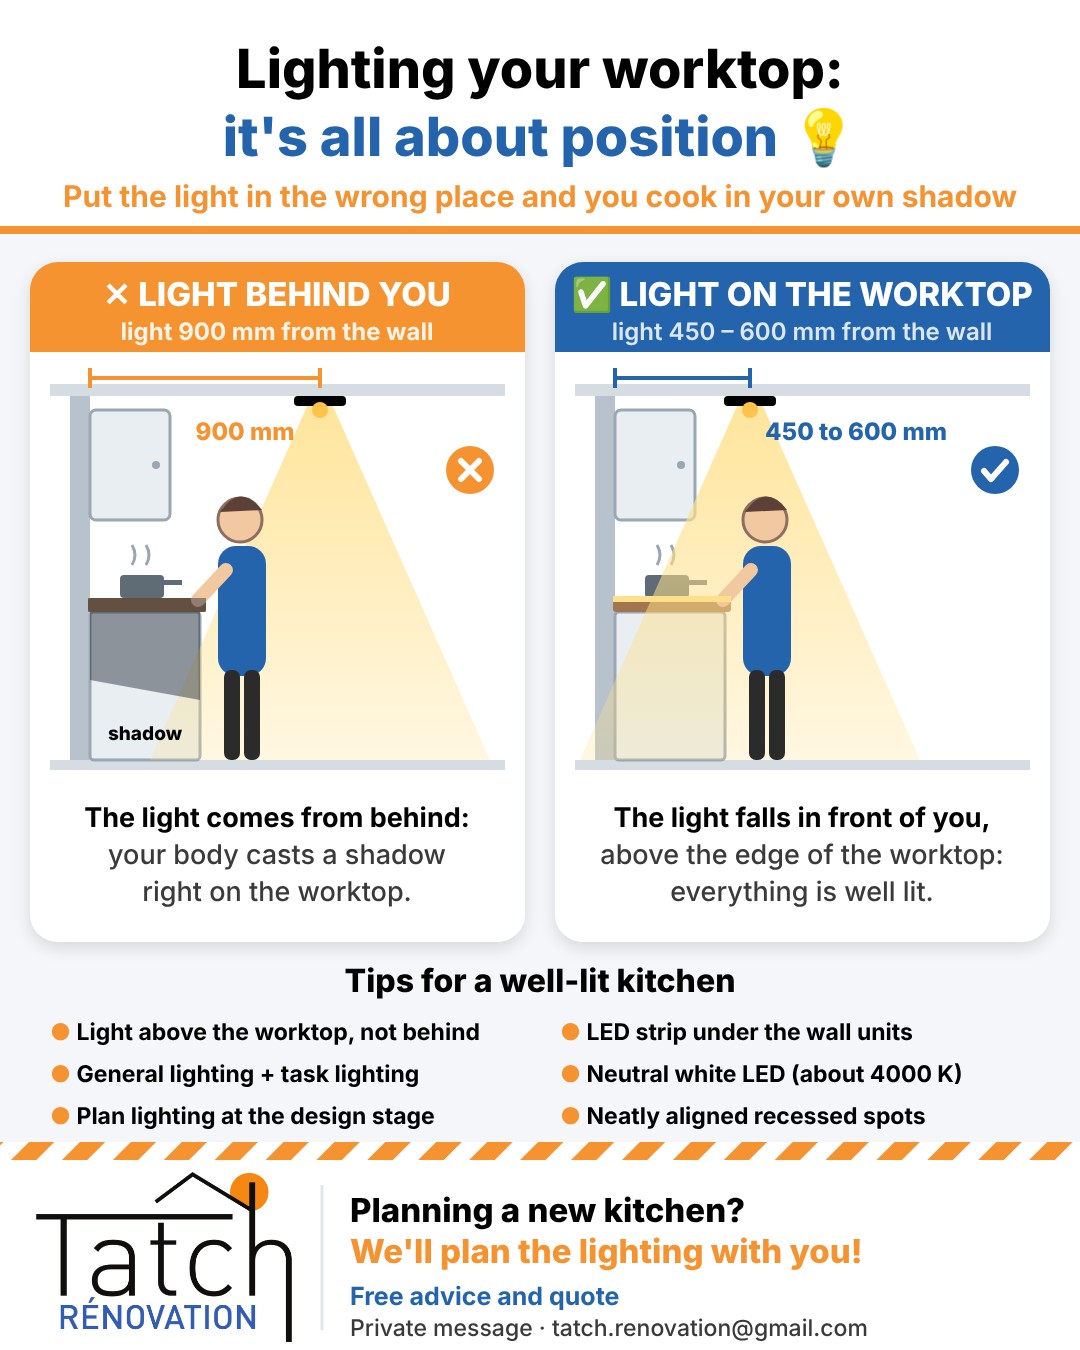
Lighting your worktop: it's all about position
It's a very common mistake in kitchens: the ceiling light or spotlights are placed in the middle of the room, or too far from the wall. So when you face the worktop, the light comes from behind you and your body casts a shadow exactly where you chop, peel or cook.
The right approach: place the lighting 450 to 600 mm from the wall, roughly above the front edge of the worktop. The light then falls in front of you, on your hands and on the work surface.
For full comfort, combine general lighting for the room with dedicated task lighting: an LED strip under the wall units, or neatly aligned recessed spotlights. For colour, a neutral white (around 4000 K) shows food colours well without feeling cold.
The best time to think about it? At the kitchen design stage, before the ceiling and units go in.
Talk about my kitchen project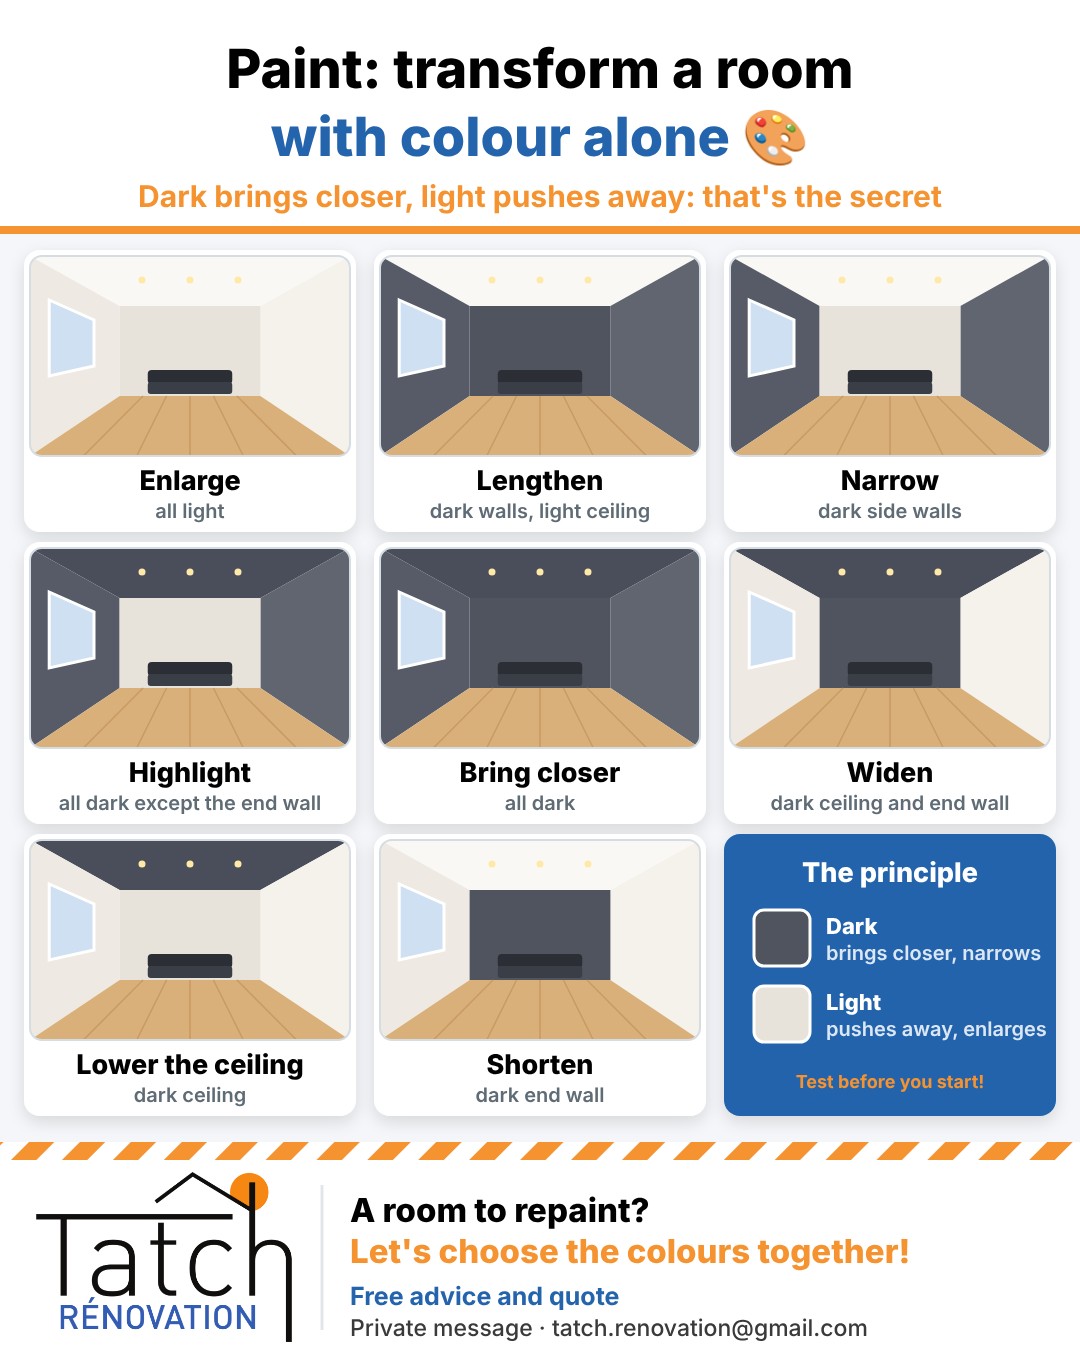
Paint: transform a room with colour alone
A room that's too narrow, a ceiling too high, an endless corridor? Before knocking down walls, think paint. The secret fits in one sentence: dark colours bring things closer, light colours push them away.
To make a room bigger, keep everything light, ceiling included. To widen a narrow room, darken the ceiling and the end wall while keeping the side walls light. Conversely, dark side walls narrow the room.
Ceiling too high? A dark ceiling visually lowers it and makes the room cosier. Room too long? A dark end wall brings it closer and shortens the space. And to highlight a wall, a fireplace or a headboard, darken everything around it and keep it light.
Think about light too: a dimly lit room handles dark colours less well. Always test on a patch of wall before you start.
Repaint a room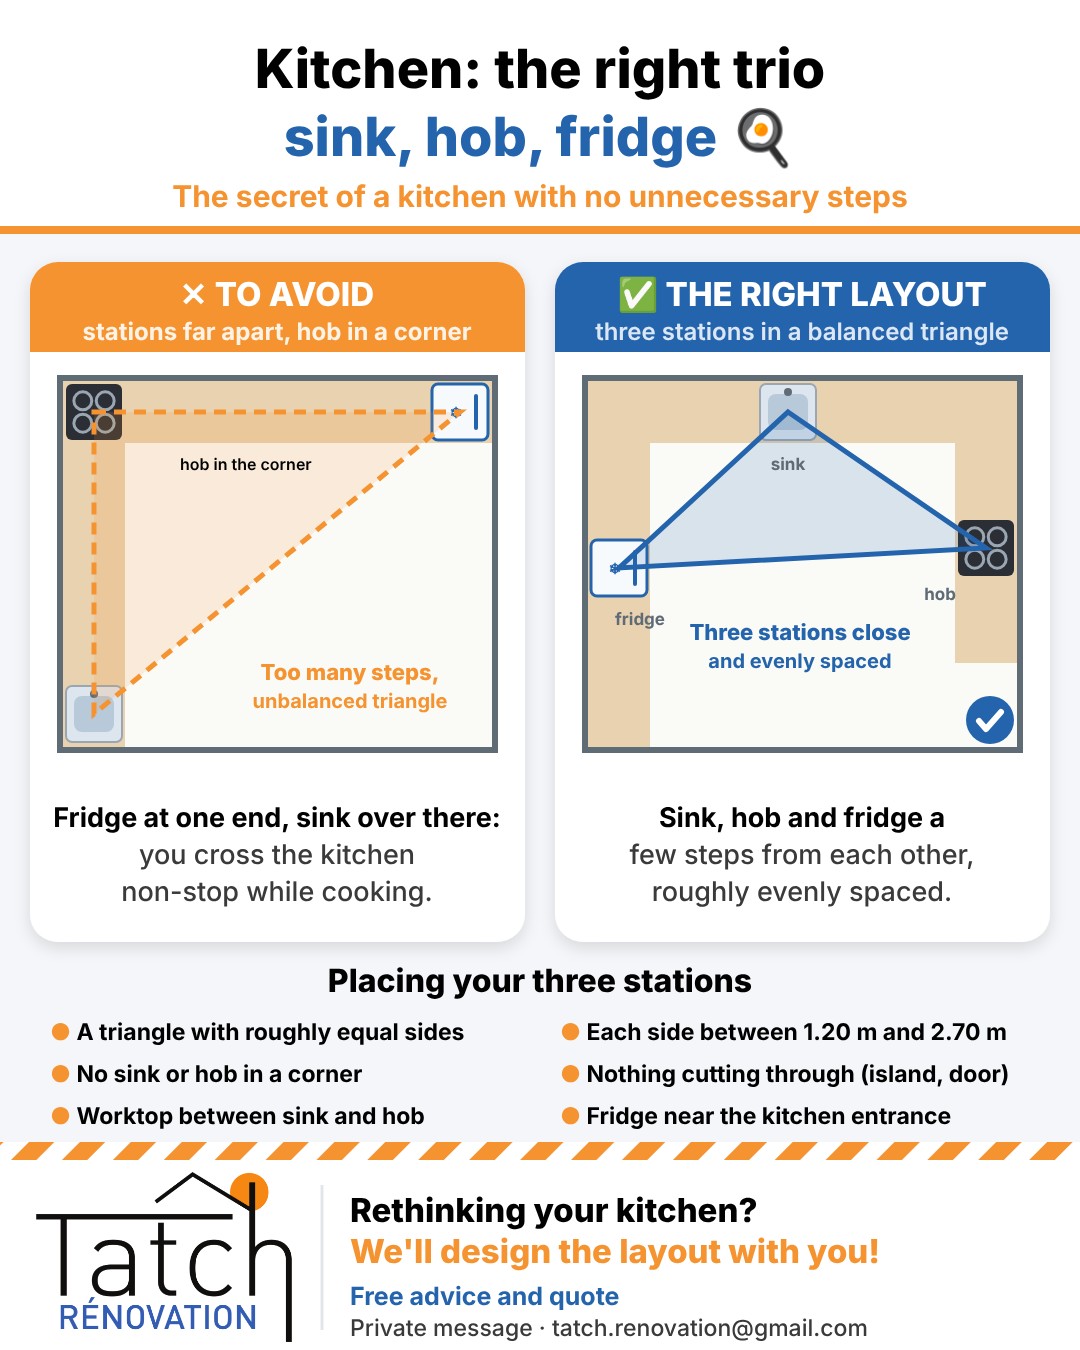
Kitchen: the right trio of sink, hob and fridge
When you cook, you keep going from the fridge to the worktop, from the worktop to the sink, from the sink to the hob. These three stations are the heart of the kitchen: if they're too far apart, you take far more steps without realising.
The idea is simple: place the sink, the hob and the fridge so they form a triangle with roughly equal sides, neither too tight nor too stretched. As a guide, each side works best at about 1.20 m to 2.70 m.
Two traps to avoid: squeezing the hob or sink into a corner, where there's no room to work and put utensils down, and cutting through the triangle with an island or a walkway. A proper stretch of worktop between the sink and the hob makes cooking much more pleasant.
Rethink my kitchen layout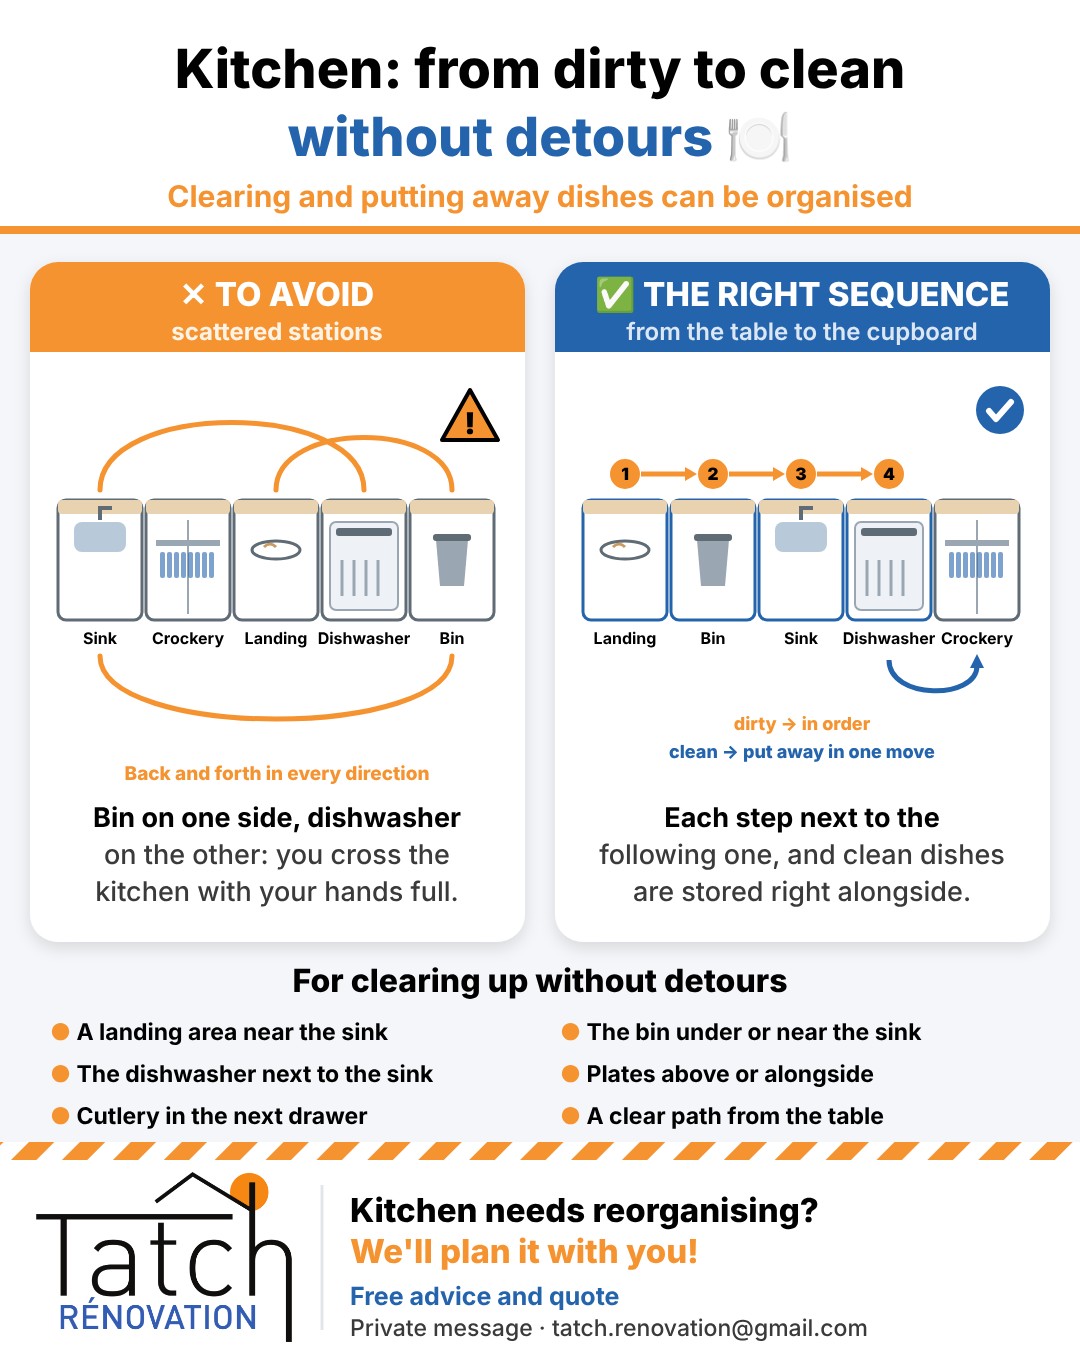
Kitchen: from dirty to clean without detours
At the end of a meal, the dishes always follow the same path: you put them down, scrape the leftovers, sometimes rinse, then everything goes into the dishwasher. If these steps are scattered, you cross the kitchen with your hands full.
The right layout: a landing area near the sink, the bin just below or beside it, and the dishwasher right next to the sink. Dirty plates move from one station to the next without crossing paths.
And the same goes the other way: plate cupboards and the cutlery drawer go right next to the dishwasher. You empty it in one movement, without walking around the room.
Reorganise my kitchen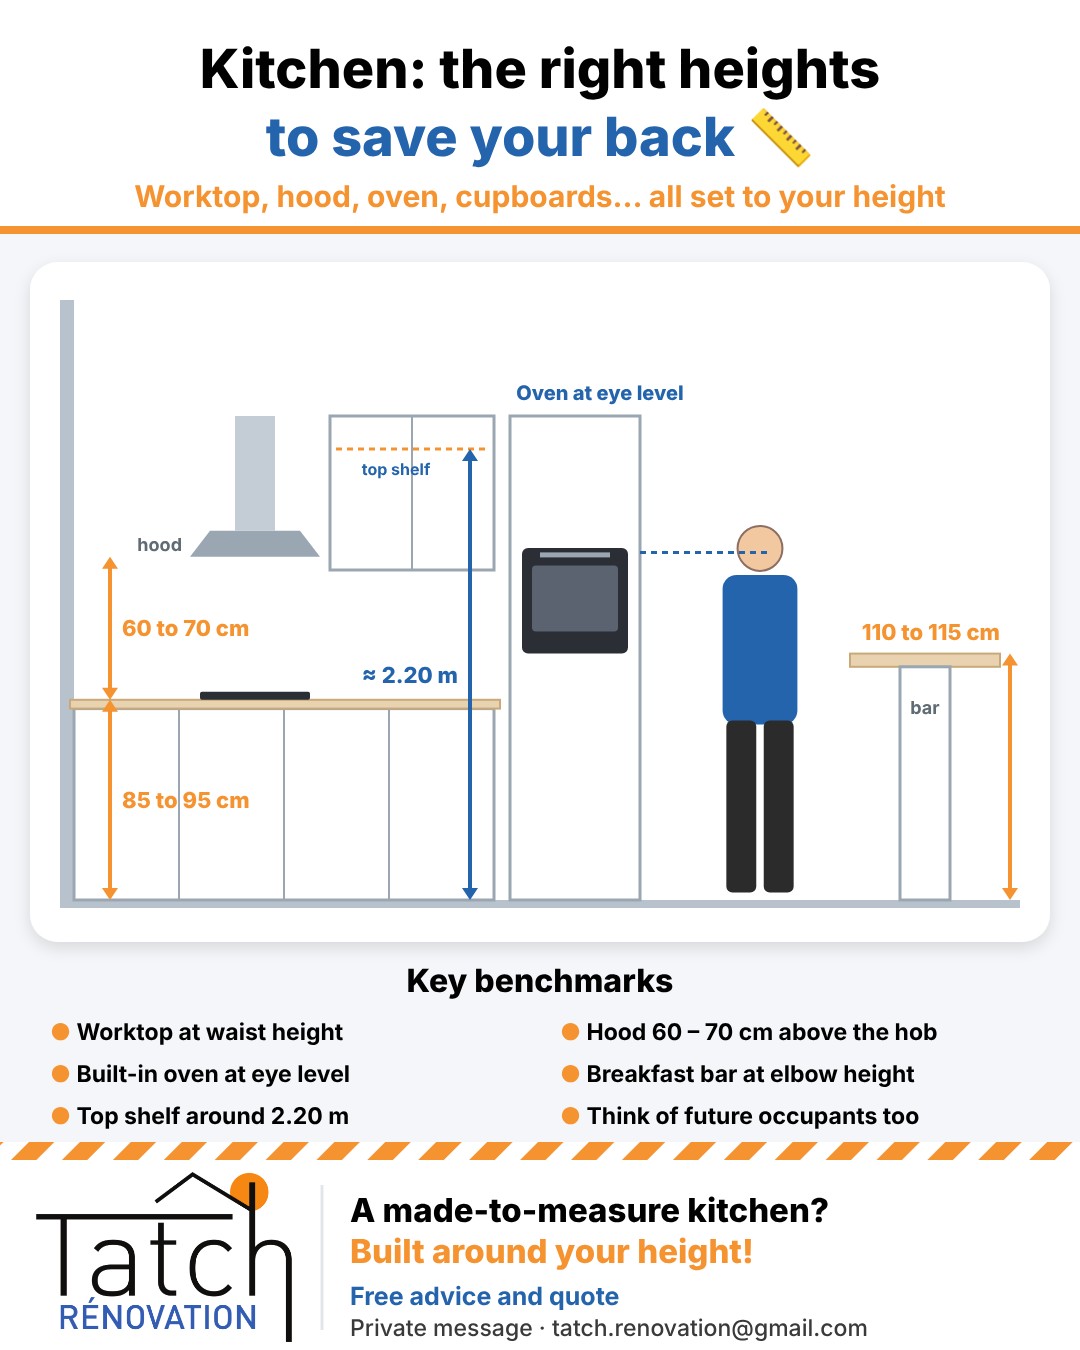
Kitchen: the right heights to save your back
A worktop too low and your back suffers; too high and it's your shoulders. The right heights depend first on your height, but a few benchmarks help you get it right.
The worktop sits at waist height, usually between 85 and 95 cm: you should be able to touch the bottom of the sink without bending. The cooker hood goes about 60 to 70 cm above the hob, high enough not to bump your head, low enough to extract properly. A built-in oven in a tall unit is ideal at eye level, and a breakfast bar sits at elbow height, around 110 to 115 cm.
At the top of the cupboards, the last truly usable shelf is around 2.20 m. Finally, remember the kitchen may be used by others after you: if you sell or rent, standard heights remain a good choice.
A kitchen made to measure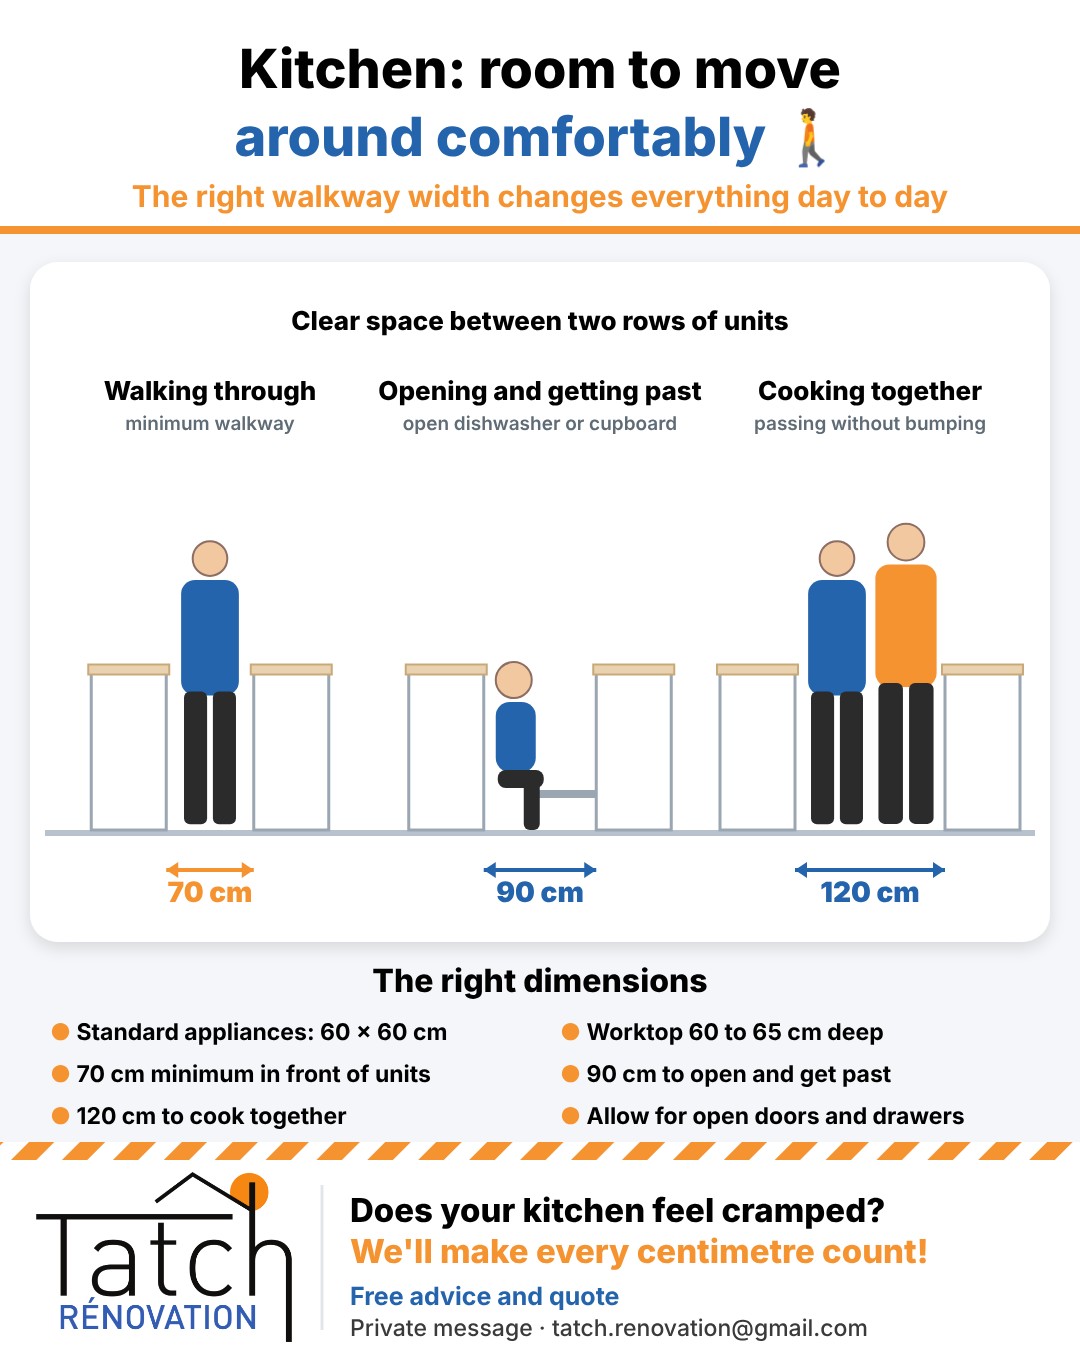
Kitchen: room to move comfortably
A pleasant kitchen isn't just about nice units: it's also about room to move. Large appliances (oven, dishwasher) fit in a 60 cm square, hence the standard worktop depth. Many kitchens now go to 65 cm for extra comfort.
In front of the units, keep at least 70 cm clear to walk through. With 90 cm, you can open a dishwasher or cupboard and still get past easily. From 120 cm, two people can cook and pass each other comfortably.
These few centimetres are decided at the design stage: once the units are fitted, it's too late to get them back.
Make the most of my kitchen🌳 Outdoor projects
Timber deck: it all starts with the ground
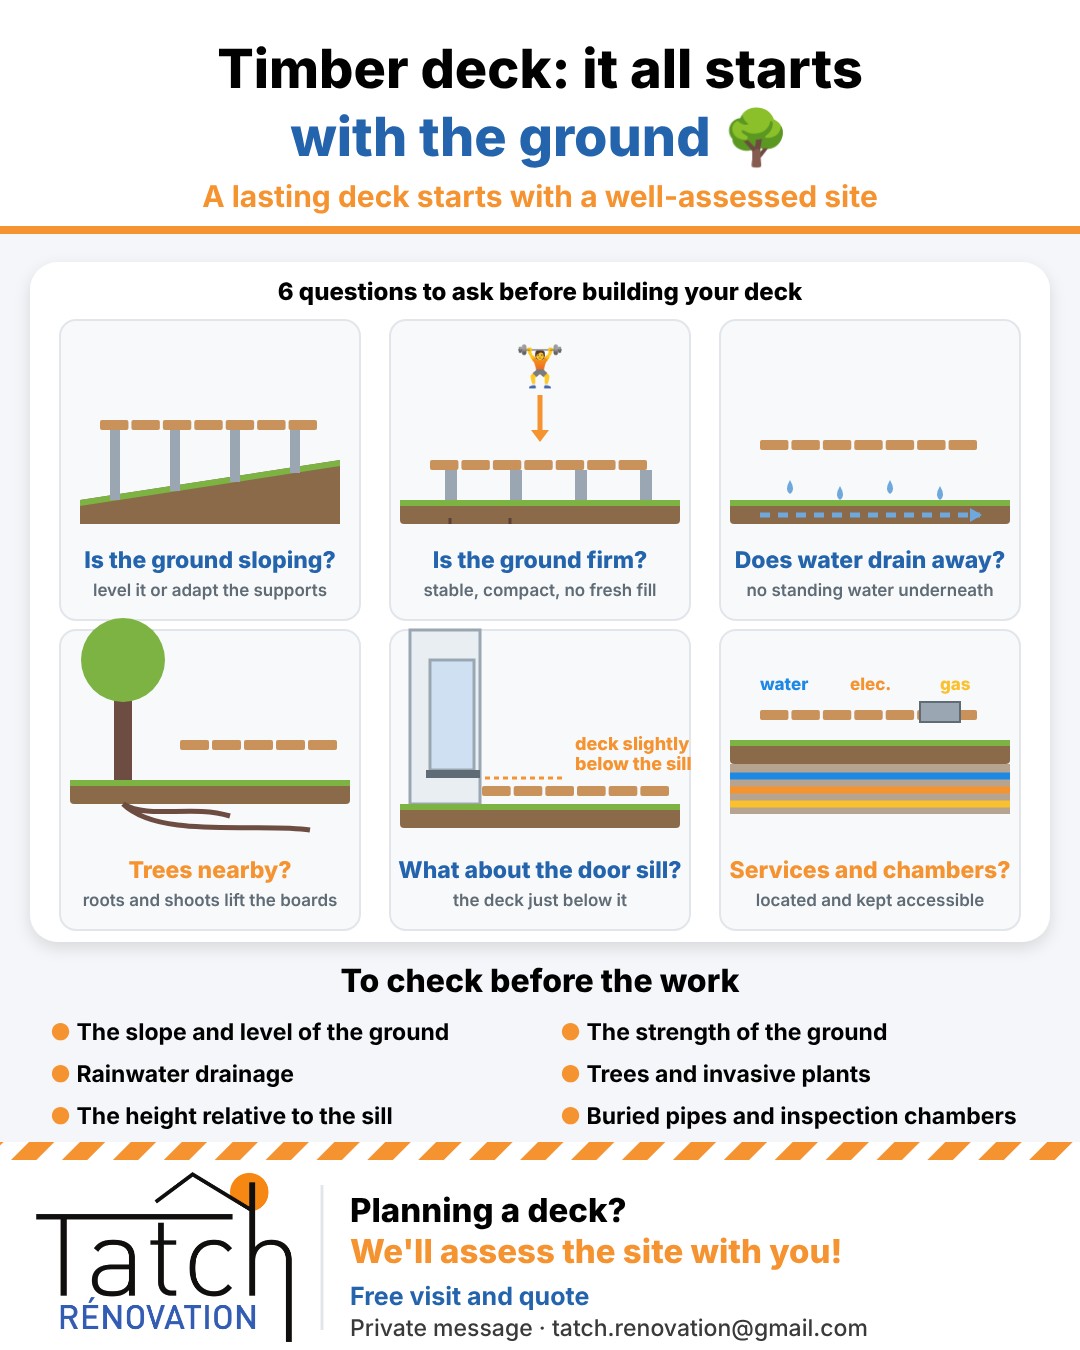
Before talking about timber species or board colour, a good deck is decided under your feet. Studying the site determines the structure needed and how long the deck will last.
The slope: sloping ground is dealt with either by levelling it or with adjustable supports or a suitable frame. Ground strength: the deck must sit on stable, compact ground, never on freshly added fill that will settle. Water: the ground must be able to drain rainwater; a permanent puddle under the boards means constant moisture and rotting timber.
Around the deck, we also look at plants: the roots of a nearby tree or invasive plants such as bamboo can lift the deck. Against the house, we set the height so the deck sits just below the threshold of the patio door, also thinking about accessibility. Finally, we locate buried services (water, electricity, gas…) and keep inspection chambers accessible.
Have my deck project assessed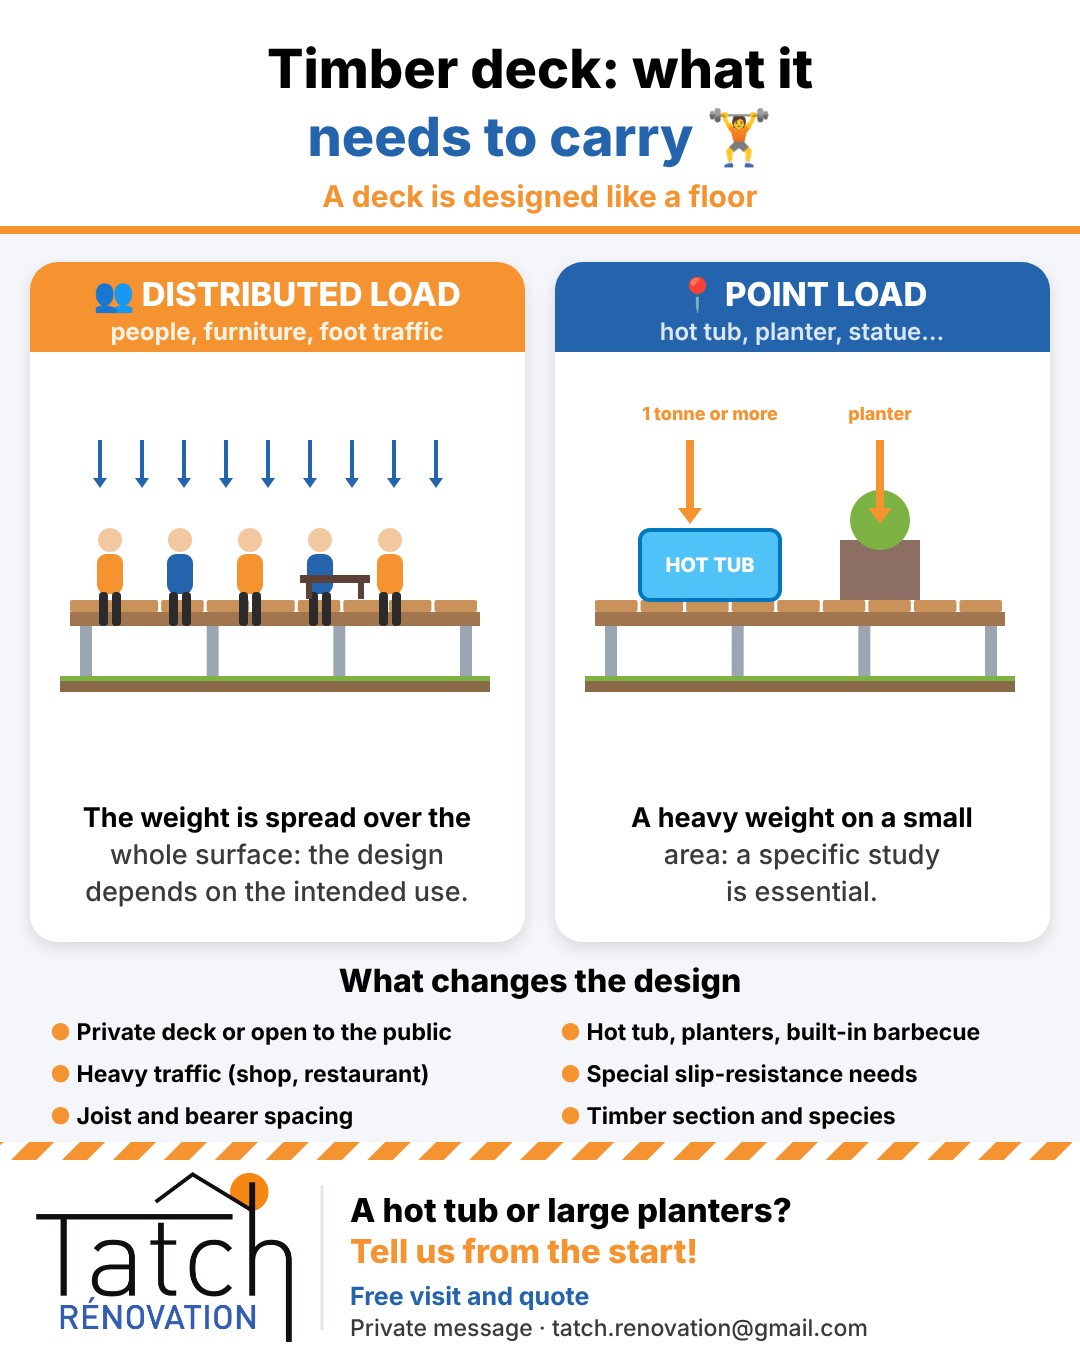
Timber deck: what it needs to carry
A deck is an outdoor floor: it's sized according to the weights it will carry. There are two types of load.
Distributed load is weight spread over the whole surface: people, the table, chairs, foot traffic. It depends on use: a home deck isn't designed like a restaurant terrace or a public space. Point load is a heavy weight on a small area: a furniture leg, but above all a hot tub, a large planter, a statue or a built-in barbecue.
A filled hot tub can weigh more than a tonne: this kind of equipment needs a specific study and a reinforced structure where it will stand. Heavy foot traffic or a particular need for slip resistance should also be planned from the start. Tell us all about your plans: that's how we choose the right timber sections and joist spacing.
Talk about my deck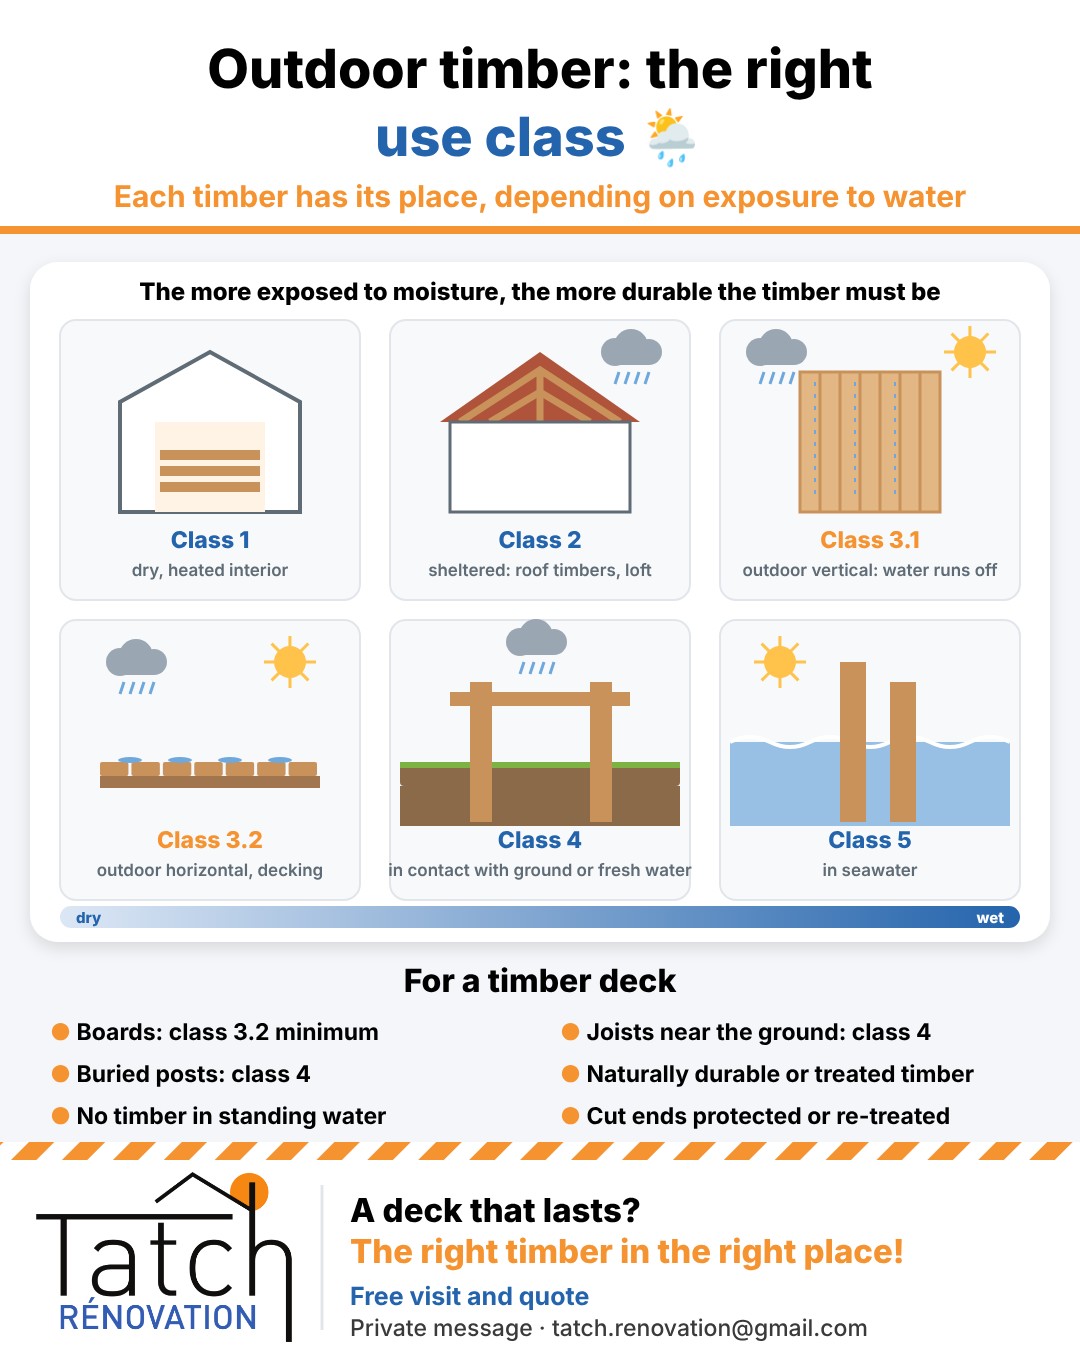
Outdoor timber: the right use class
Not all timber copes with moisture in the same way. To choose the right one, we talk about use classes: they describe how exposed the wood is to water, from driest to wettest.
Class 1: dry, heated interior. Class 2: sheltered, such as roof timbers or a loft, with occasional moisture. Class 3.1: outdoors, vertical surfaces where water runs off and dries quickly (cladding). Class 3.2: more exposed outdoors, especially horizontal surfaces such as decking boards. Class 4: in direct contact with the ground or fresh water. Class 5: in seawater.
For a deck, the boards should be at least class 3.2, and parts close to the ground (joists, posts) class 4. This is achieved with a naturally durable species or suitably pressure-treated timber. And the details matter: no timber in contact with standing water, and protected cut ends.
Choose the right timber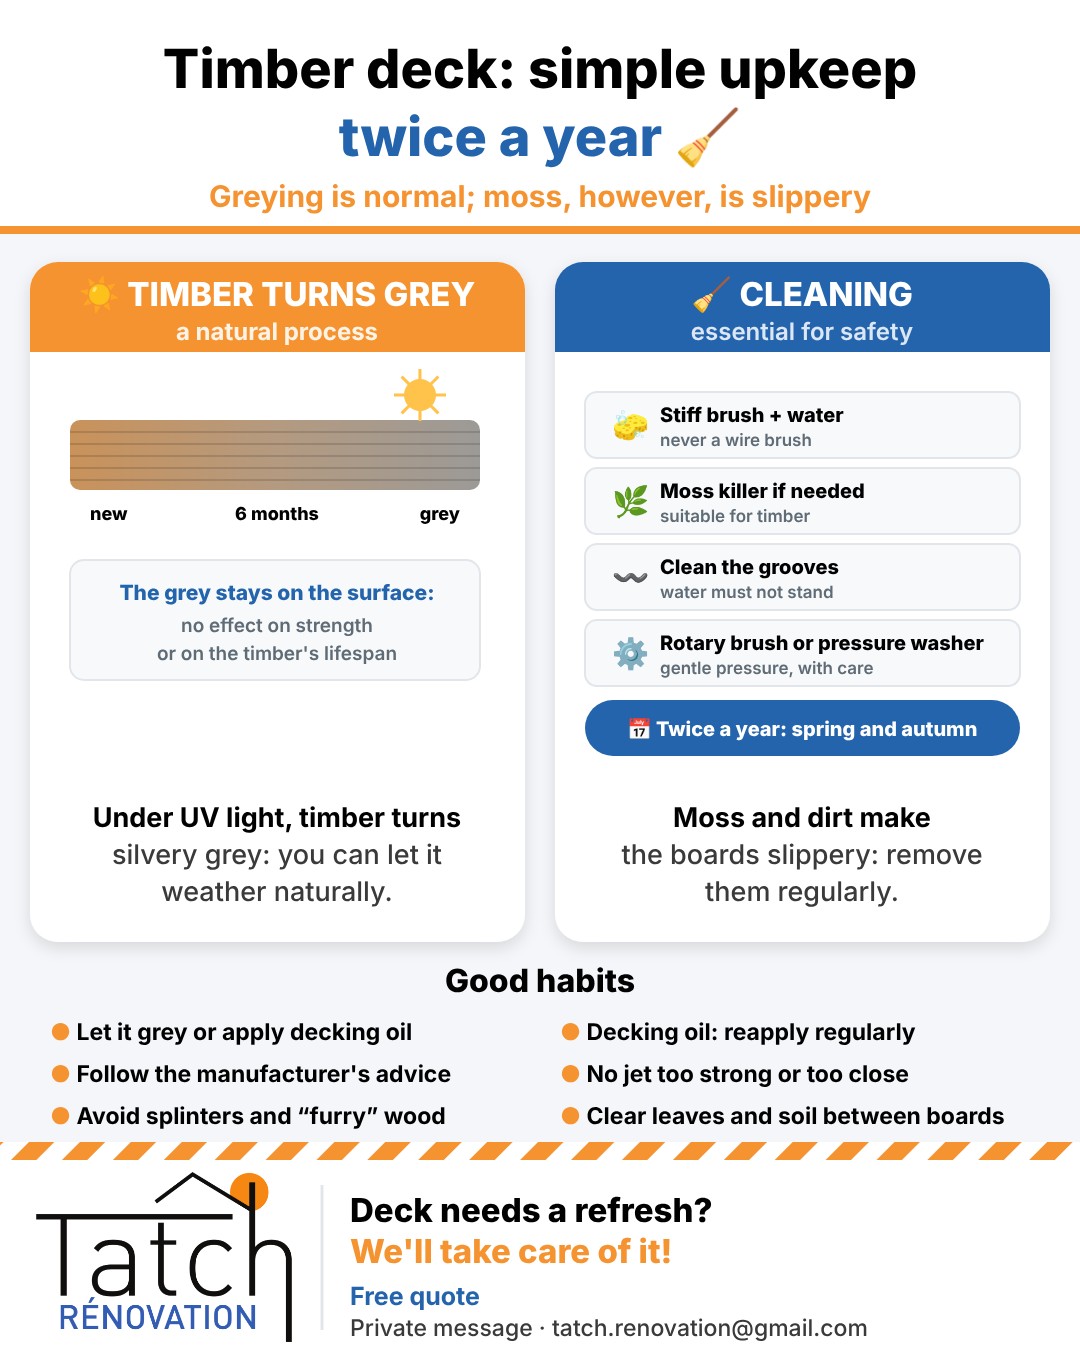
Timber deck: simple maintenance twice a year
A timber deck turns grey over time: the sun changes the surface colour, often within the first few months. Don't worry, this silvery grey has no effect on the strength or lifespan of the wood. Many people choose to let it weather naturally.
What really matters is cleaning twice a year (spring and autumn). Moss, mould and dirt make the boards slippery, especially where water stands. Clean with water and a stiff non-metallic brush, after a suitable moss killer if needed, taking care to clear the grooves. A rotary brush or pressure washer can help, as long as the pressure stays gentle and the wood isn't damaged: it must not fray or splinter.
Prefer to keep the original colour? A decking oil or suitable finish will do it, but needs regular reapplication: follow the manufacturer's instructions for application and frequency.
Have my deck maintained📋 Paperwork
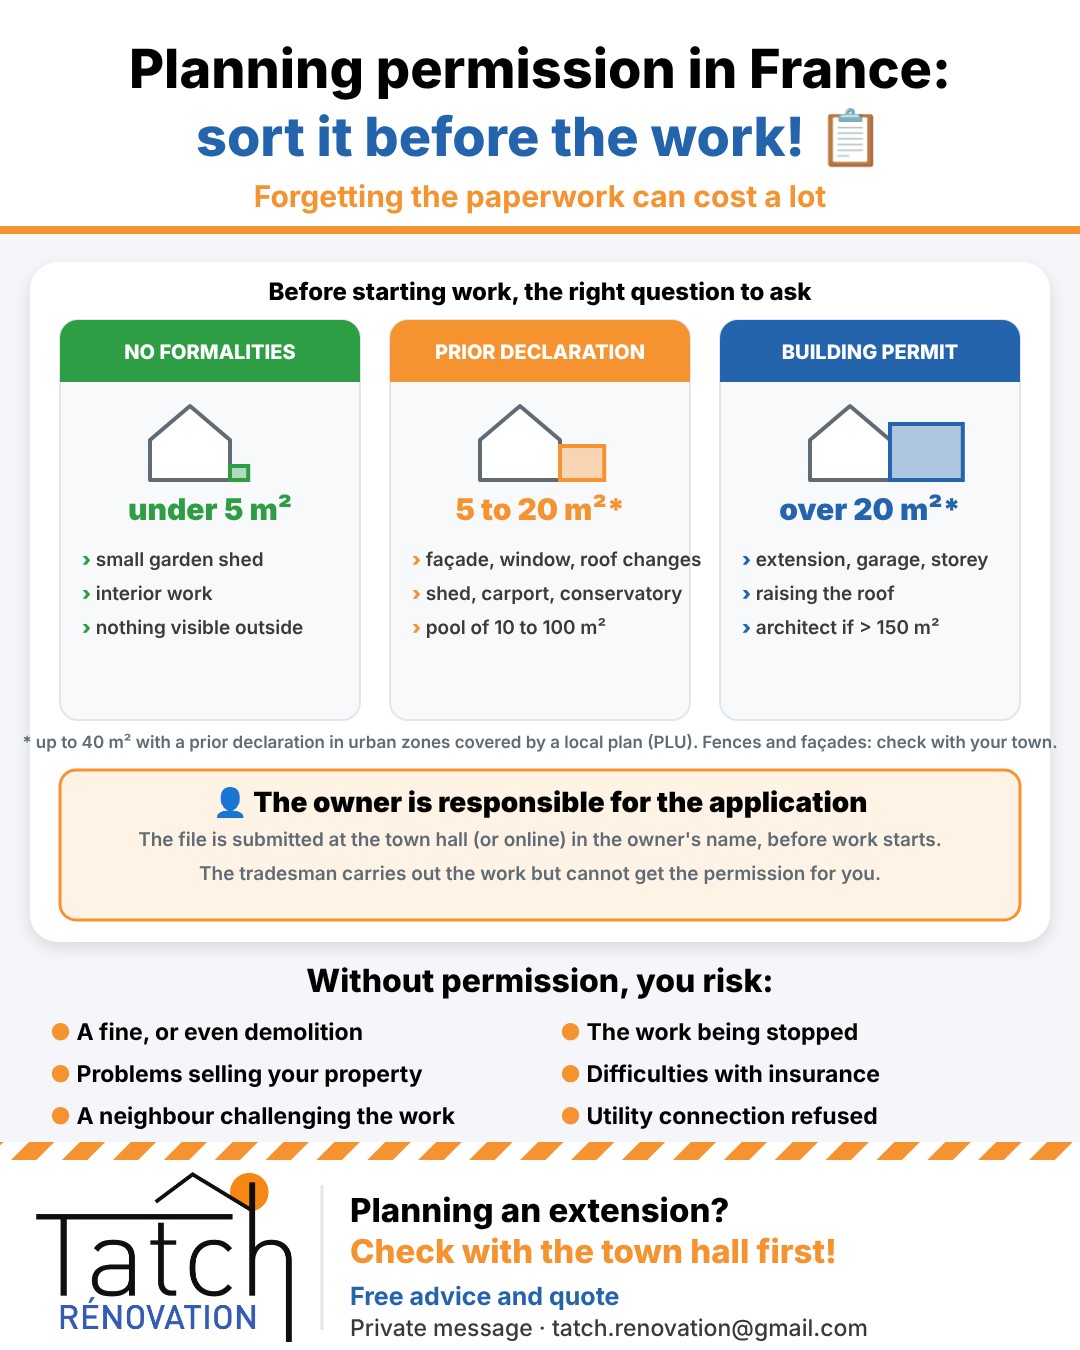
Planning permission: think about it before the work
Extending, creating an opening, changing the look of a façade, adding a conservatory or building a shed: many projects need approval from the town hall before work starts. And these applications are the owner's responsibility: as the client, it's you who submits the application in your name. The tradesman carries out the work but cannot obtain the permission for you.
Key thresholds in France: under 5 m² created, generally no formalities. Between 5 and 20 m², or as soon as you change the exterior appearance (façade, window, roof), a prior declaration (déclaration préalable) is enough. Above 20 m², you need a building permit (permis de construire). In urban zones of towns with a local plan (PLU), the prior declaration covers extensions up to 40 m². And if the total floor area of the house exceeds 150 m², an architect becomes mandatory.
Allow about one month for a prior declaration and two months for a house building permit, not counting any requests for additional documents. So it's best to start early.
Building without permission can be costly: a fine, the site being stopped, or even having to restore or demolish. Problems often surface much later, when selling or making an insurance claim. Rules vary from town to town, especially for fences and protected areas: the right reflex is to check with the town hall's planning department before signing the quote.
Talk about my project